Saturday, 14 March 2009

Last Minute...

It's my oldest school friend's birthday today - so I decided to design her a scarf. Yesterday. Procrastination is my middle name! And my friend's middle name is Myna, hence the name of the scarf.


So, as usual, here is the pattern. Free to use blah blah. Please credit me as the designer as always, and link back to my blog for the pattern.

Myna

You will need:

Approximately 50g of fingering weight yarn. I used Moda Vera Soya because I love the drape, so something similar such as bamboo would work just as well. It's not a long scarf, I used about 165 metres (just over one ball). Make it as long as you like.

5mm knitting needles.

2.75mm crochet hook. (Don't worry, it's just for the beading at the end. If you can crochet a chain (ch) and do a slip stitch (sl st) , that's all you need to know. If you can't, learn - it's easy!)

A large-ish glass bead or pendant.

Approximately 30 6mm beads.


Cast on 3 sts.

Row 1: K3
Row 2: Kfb, k1, kfb (5sts)
Row 3: K5
Row 4: Kfb, k3, kfb (7sts)

Ok, you get the idea. You're knitting all the odd numbered rows, and increasing each even numbered row by 2 stitches, 1 at either end. I stopped when I got to 29 sts, but as long as you've got an odd number of stitches, you can have it as wide or as narrow as you like. Finish on an odd row.

The pattern:

Row 1: *K2tog, yo* to last stitch, k1.
Row 2: Knit all stitches.
Row 3: Knit all stitches.

That's all there is to it! Knit those 3 rows until the scarf is as long as you want it, and cast off at the end of a row 3. Leave the last stitch active though, you're going to use your crochet hook now.

Thread your 6mm beads onto the yarn. With your hook, starting with the last active stitch, ch 11. Move one bead up, and secure it in the chain with a sl st. Ch 11, get another bead and secure it to the cast off row with a sl st. Carry on in this way, spacing your beads evenly across the cast off row (sometimes you'll secure in the next cast off stitch, sometimes you'll miss a stitch to keep it even) ending with a sl st and bead at the opposite end of the cast off row.

At the beginning end of the scarf, use the cast on tail of the yarn and crochet a chain of about 8 - 10 sts. Thread your large glass bead or pendant onto the chain, and secure the chain to the point of the scarf with a sl st.

Work in the ends. Easy huh?

Let me know if something's not clear or doesn't make sense and I'll try to write it clearer. Now - go to it!

Wednesday, 11 March 2009

Magic Mitts


Magic Mitts


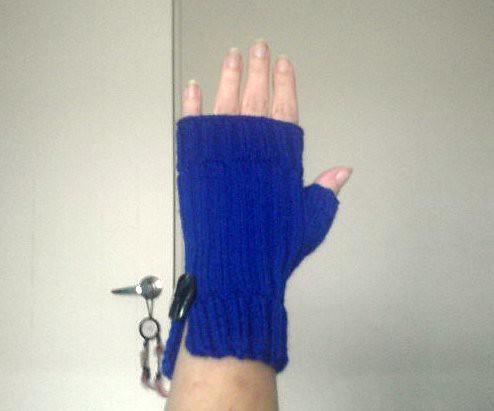
Here's another free pattern for you. Quick and easy, I whipped them up in a few hours for my friend's little boy. They would be easy to make bigger or smaller too, just add or decrease stitches in multiples of 4 (remember to adjust the thumb gusset accordingly). This pair fits approximately ages 4 to 7, there's a lot of stretch in them. And they look hideous when there are no hands in them! Just so as you know, and don't freak out while you're making them.
You will need:
2.5mm circular needles
Approximately 30gm fingering weight yarn
2 small safety pins to use as stitch-holders
2 stitch markers if required.
Cast on 48 sts and join for knitting in the round, 24sts on each needle.
K2, P2 rib for 3.5 inches.
On the next round, kfb, k1, continue knitting in rib to end of round.
On each round now, you will increase 2 sts to create the thumb gusset. So the next round will be kfb, kfb, *p2, k2* to last 2 sts, p2.
Next round: Kfb, k2, kfb, *p2, k2* to last 2 sts, p2.
Next round: Kfb, k4, kfb, *p2, k2* to last 2 sts, p2.
Continue increasing in this manner until you have an extra 18 sts, then on the next round, knit those extra sts and place half each on a small safety pin and forget about them for now.
K2, P2 rib on the remaining sts (you should still have 48 active sts) for another 2.75 inches.
Cast off knitwise.
Now you'll need to put those thumb gusset sts back on your needles, 9 sts on each. Knit one round, picking up 2 sts from where the body of the mitt joins the thumb. This will help to close any gaps, and means that you now have 20sts on your needles. For the next 7 rounds, *k2, p2* around, then cast off knitwise.
Work in ends.
As always, if anything doesn't make sense or is unclear, let me know! And again, as always, feel free to use the pattern to make gifts, or to sell the mitts, but please link back to my blog and credit me as the pattern designer.

Tuesday, 24 February 2009

Stunned!

I'm blown away by the interest shown in my patterns through Ravelry. Thank you all so much! I thought that with all those free patterns out there mine would slip through relatively unnoticed but I was so wrong!


x0x0x

Monday, 23 February 2009

Ok, Enough Procrastination!!!

I've been putting this off for long enough. Here's another pattern for anyone who wants it. Again, feel free to use it for whatever you want, but please link back to my blog for the pattern. Ta much!

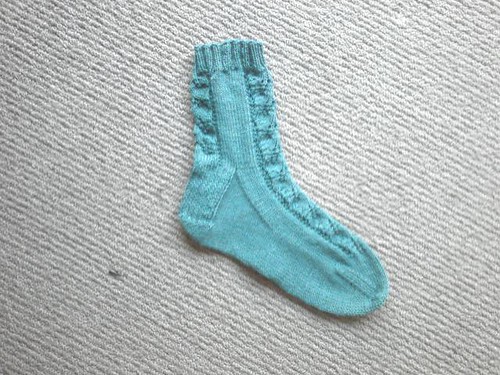
Heard it Through the Grapevine...

I wanted to create something a little different, and to have a go at designing a sock pattern. There are so many out there, but now there’s a little bit of me too. This was made for a fellow Raveller who visited me from Australia, and while she was here she bought me some pretty sock yarn. I wanted to do something especially for her as well. This is a pattern for those sock knitters out there who have some experience; I won’t be detailing stuff like heel flaps and heel turns. Use whatever heel flap, heel turn and toe are your favourites.

You will need:

Size 2.5mm needles. I’ve written this pattern for magic loop.
100gm of fingering weight sock yarn. I’ve used Opal Uni, but it would work with any other. I would recommend something that’s either plain coloured or semi-solid so that you can see the lace pattern.

CO 64 sts. (The stitches down either side of the sock are in stockinette, so if your foot is bigger than average, add extra sts in increments of 4). Join for working in the round, being careful not to twist your stitches. (32 sts per needle).

Work in 2x2 rib (or 1x1 if you prefer). I don’t particularly enjoy ribbing so I usually don’t do more than 1 ¼ inches but it’s entirely up to you.

The Pattern:

Rnd 1 – *K6, p2, k9, yo, k1, yo, k3, sl 1, k2tog, psso, p2, k6. Rep from * to end.

Rnds 2, 4, 6, 8, 10, 12 – K all sts.

Rnd 3 - *K6, p2, k10, yo, k1, yo, k2, sl 1, k2tog, psso, p2, k6. Rep from * to end.

Rnd 5 - *K6, p2, k3tog, k4, yo, k1, yo, k3, [yo, k1] twice, sl 1, k2tog, psso, p2, k6. Rep from * to end.

Rnd 7 - *K6, p2, k3tog, k3, yo, k1, yo, k9, p2, k6. Rep from * to end.

Rnd 9 - *K6, p2, k3tog, k2, yo, k1, yo, k10, p2, k6. Rep from * to end.

Rnd 11 - *K6, p2, k3tog, [k1, yo] twice, k3, yo, k1, yo, k4, sl 1, k2tog, psso, p2, k6. Rep from * to end.

*** On rnd 11 of the last pattern repeat for the cuff, knit as written for the front of the sock, but on the back knit as follows: K6, p2, k3tog, [k1, yo] twice, k11, p2, k6.

Repeat these 12 rounds until your cuff is the desired length. I’ve done 4 pattern repeats for my sock cuffs, giving me a total of 5 inches for the cuff.

Work your chosen heel flap and heel turn, pick up your gusset stitches, and carry the pattern on down the top of the foot. When the foot is approximately 2 inches shorter than your foot, end with row 11 of the pattern ***K6, p2, k3tog, [k1, yo] twice, k11, p2, k6*** as for the back of the cuff.

Work your toe decreases, kitchener, and finish off. Now cast the other one on before Second Sock Syndrome kicks in!


Thursday, 19 February 2009

Matching Sapphire & Steel Mitts... but still no socks.

Sapphire & Steel Fingerless Mitts

More hideous cellphone camera pics. And they look so much better on than sitting on the table! They do look very small when they're not on, but I've even made The Man try them on and they seem to stretch forever.

Ok the pattern...

You will need:
Approx 40gm of fingering weight yarn
2.5mm circular needles
3.25mm circular needles
2 buttons approx 1" diameter for accent.
Using 3.25mm needles, cast on 64sts. Make sure it's a stretchy cast on - I used long tail cast on over both needles together (as I always do). Do not join for working in the round yet, but knit in K2, P2 rib for 1.5".
Change to 2.5mm needles, join for working in the round, and knit 2 rounds plain.
Now, as with the cowl, you'll be working the opposite rib, so it'll be P2, K2 rib for 2".
Work another 32 sts, which will take you to the middle of the round. This is your new starting point, and it will remain this way for the rest of the mitt. This will make sure that the button is on the outside of your wrist.
Next round - K1, Kfb, PM. Continue in rib until last st of round, PM, kfb, k1.
Next round - K2, kfb, PM. Continue in rib until last 2 sts of round, PM, kfb, k1.
Continue increasing 2 sts per round in this manner until you have 14 sts before the first marker and 14 sts after the 2nd marker. Now the explaining gets tricky. You'll need to place 26 of those sts onto waste yarn, which will mean knitting all of the new sts so you can do so. Continue in P2, K2 rib on the remaining hand sts for a further 1".
Knit 2 rounds plain, then change your rib back to K2, P2 rib and knit for another 1.5" Cast off knitwise (make sure your cast off is not too tight).
Ok, back to the thumb. You'll need to get those 26 sts back on to the circular needle (yep, still the 2.5mm), 13 sts on each needle. Pick up 2 sts from between the thumb gusset and the body of the mitt and knit one round. K2, P2 rib for a further .75", then cast off thumb sts (again, cast off knitwise and keep it loose).
Work in ends, and sew button at the top of the flat rib section. Do it all over again.
If anything in this doesn't make sense or is confusing, let me know and I'll try to make it clearer.

Monday, 16 February 2009

Cats!!!


See this gorgeous kitty? She's being such a tart. We got this baby about 5 weeks ago,

and now our big kitty has started spraying. Apparently she's very territorial. They're both 'fixed' so spaying is not an option. She has her own space that little kitty isn't allowed in, they have separate food bowls (although big kitty Keva is more than happy to help herself to Kaos's food too - she's getting fat!) and she goes outside whenever she likes. So frustrating! And spraying on/near my knitting/crocheting is a huge bummer. Might have to check out the pheromone diffuser I've been told about.

Friday, 13 February 2009

Procrastination & Progress

Still working on the sock pattern. That's the procrastination bit.

The progress bit is that I have a cowl pattern for anyone who wants it. Feel free to print the pattern, use it for whatever, sell products made from it - but please, link back to my blog rather than posting the pattern online. There will be matching fingerless mitts to come, I've nearly finished those too, but for now, here's the cowl.

Sapphire & Steel Cowl

(Apologies for the blurry pic, I've only got my cellphone camera at the mo)

Ok, you will need:

  • 3.25mm circular needles (ETA: I'm doing this again in fingering sock yarn and have discovered that the gauge is much looser. Perhaps the yarn I used previously might have measured sportweight by wpi. Would suggest a smaller needle size, just for the inside of the cowl, so instead of 3.25, maybe 3mm or even 2.75)
  • 4mm circular needles
  • fingering yarn (I've used a discontinued brand for this one, any fingering should work just fine. Would look lovely in a variegated/semisolid sock yarn). Approximately 70 - 75gm should do it. I used a fraction over 50gm for the prototype but it really does need to be longer.
  • 1 x 1" button for accent

Cast on 156 stitches on 3.25mm needles. I used longtail cast-on, just make sure that your cast on is stretchy. Join for knitting in the round (be careful not to twist stitches).

Work in K3, P3 rib for 4". In mine I only did 3" but it is a little short in the neck.

Change to 4mm needles. Now is the time to stop working in the round, you will be knitting the rest flat (yep, backwards and forwards).

Knit 1 row, Purl 1 row. This will create the foldover. The side that sits nicely outside the cowl is the Right Side (RS).

Now you'll be working the opposite rib, so it'll be P3, K3 rib for the next 5". I only did 4" in the sample shown, but again, it could be a little longer.

Cast off/bind off (you choose depending on where in the world you are ;-p) after a wrong side row, knitwise.

Work ends in.

Sew button at the top of the cowl where you began to knit flat. I used that opportunity to close up the gap just a little so that it didn't gape too much.

Done! Now knit my matching mitts and you'll be away.