Tuesday, 11 August 2009

ToddlerSox

Here is the other part of the customer order - little socks for her granddaughter. She really liked the baby socks I made to show her, and wanted exactly the same but bigger. A little number crunching and measuring and a lot of note-taking later, I'm happy with the result.


Make all the socks you want to from the pattern, but please link to this page for the pattern itself, don't copy it anywhere else. If something doesn't sound right, let me know and I'll try to clarify.

ToddlerSox

You will need:

3mm circular needles

Small amounts of contrasting fingering weight yarn, or do them all in one colour if that suits you better.

A tapestry needle for sewing in ends.

Cuff:

Using the long-tail method, cast on 42 sts over both needles (makes for a super-stretchy, yet tidy cast on) and divide over both needles evenly, 21 sts per needle. Making sure the stitches aren't twisted, join for working in the round.

20 rows of K2, P1 rib will give you about a 2 inch cuff. I wouldn't do any less, but feel free to make it longer if you prefer.

Cut your first yarn, and join your contrasting for the heel flap/foot. For the heel flap you'll be working backwards and forwards over the 21 sts on one needle.

Heel Flap:

Row 1: K1tbl, k2, p16, k2, sl1 with yarn held in front.

Row 2: K1tbl, k2, *sl1, k1* rep from * to * to last 3 sts, k2, sl1 with yarn held in front.

Repeat these last 2 rows for a total of 1 1/4 inches ending with a purl row.

Heel turn:

Row 1: Sl1, k11, ssk, k1, turn

Row 2: Sl1, p5, p2tog, p1, turn

Row 3: Sl1, k to last st before gap created by prev ssk, ssk, k1, turn

Row 4: Sl, p to last st before gap created by prev p2tog, p2tog, p1, turn

Repeat these 2 rows, working one more stitch each time until all heel sts are worked. You should finish on a purl row.

Gusset stitches:

Knit across heel flap sts, and along the side of the heel flap you will see a series of larger loops caused by the slipped sts at the end of each heel flap row. Pick up and knit these sts, and then make another 1 or 2 sts at the foot end of the heel flap side just to close up any gaps that might have been.

Rib across the instep sts, then make 1 or 2 sts at the top of the heel flap before picking up the slipped sts across the other side of the heel flap. I deliberately haven't given you a specific number to pick up, as long as you have 1 st in each slipped st and one or two to close the gap, and both sides are within a stitch count of each other, you'll be fine.

For the next few rounds, you will rib across the instep sts in the established rib pattern, and knit across your gusset, k1, ssk, k to last 3 sts, k2tog, k1. You will be decreasing your gusset stitch count by 2 sts per round.

Foot:

When your gusset needle st count has returned to 21, and you again have a total st count of 42, rib across the top of the foot and knit the gusset sts until the foot is 4 1/2 inches (or 1/2 inch less than total required foot length).

Toe:

Top needle: K1, ssk, k to last 3 sts, k2tog, k1.

Repeat for bottom needle.

Decrease 4 sts per round until you have a total of 20 sts (10 per needle), then graft the toe sts together using kitchener stitch. Work in your ends, and start the other one. The great thing about socks for tots and babies is that they work up so quickly that you barely get time to succumb to SSS (Second Sock Syndrome).

Until next time...
ToddlerMitts

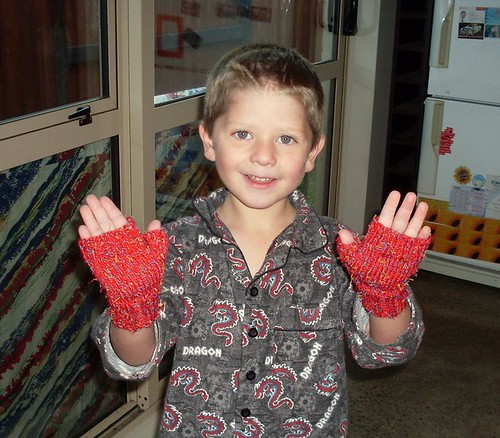
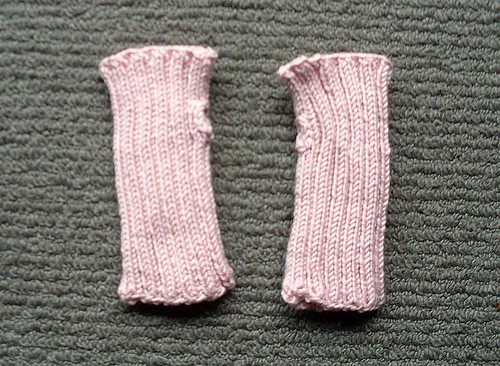
A customer at the LYS where I work part time asked me to make some fingerless mitts and socks for her 1 year old granddaughter. I said I would (cos I didn't have enough to do already, right?) and then had to figure out how to do the things I usually do for adults or babies, toddler-sized.


So first off here are some little, toddler-sized fingerless mitts. When I say toddler-sized, they're actually really stretchy, and will fit a much bigger child. I had my (small) 6-year-old try them on to see what they looked like and they fit fine, perhaps could have been a little longer at the finger end, so they'll fit from about 1 to 4 or 5 years old nicely. I've done them using magic loop, but they could easily be done on dpns if that's your thing. These are a super-quick knit, I did them over a couple of evenings in front of the tv.

As always, feel free to do whatever you like with the mitts you make from my pattern, but please credit me by linking to this for the actual pattern. If something is unclear, let me know and I'll try to clarify it for you.


ToddlerMitts

You will need:

3mm circular needles
Approximately 20-25gm fingering weight yarn
Tapestry needle for sewing in ends
2.5mm crochet hook (to slip stitch around the thumb holes, this step is entirely optional)

Using the long-tail method, cast on 44sts over both needles. (I always cast on this way for cuffs or anything that needs to be stretchy, it's loose without being sloppy). Divide the sts between both needles; 22 sts on each. When you've got them all lined up, join for knitting in the round. I've designed these to have 4 knit sts on each side, so on each needle you'll begin and end with K2.


Rib pattern:

Needle 1: K2, P2 to last 2 sts, K2.
Repeat for needle 2.

I've done a nice long cuff on these to keep little wrists warm, so if you want to do the same, rib as per pattern for 3 inches.

Thumb hole:

For the next 6 rows you'll be knitting backwards and forwards across the rows, not in the round. Continue in the established rib pattern, and slip the first stitch of each row.

On the next row, you'll rejoin at the end of the row to return to knitting in the round. I've ribbed for another inch which will be quite long over little fingers to keep them warm, if you don't want to do that much, it's entirely up to you.

Cast off very loosely in rib pattern.

If you want to slip stitch around the thumb holes, do so loosely. I only did about 7 or 8 sts around each, just for aesthetic reasons.

Work in loose ends, and make another one!

Wednesday, 3 June 2009

Anton's Monster Mitts


It's been a while...

I've been making stuff for other people, and my poor kids have been missing out. Well, according to them, they have. I promised both of them a pair of mitts a wee while ago, but so far haven't followed through. So I had a look at the patterns on Ravelry, and couldn't really find anything I wanted to make that was in Anton's size, so I made it up as I went. He was home from school with a tummy bug at the time, and was watching Monsters Inc. on dvd. Between that and the slightly hairy look of the yarn I used, Monster Mitts were spawned.

The dimensions of these mitts are as follows:
5.5" long
5.5" around knuckles
5" wrist.
They fit my wee nearly 6 year old just fine, with room for growth.

The pattern will follow the usual blah blah which is along the lines of: Feel free to use the pattern to make mitts for yourself, your kids, your cats/dogs/giraffes whoever. You can use the pattern to make mitts to sell, as long as you credit me/link to my blog for the pattern. Let me know if something's unclear, or doesn't make sense, and I'll try to sort it out.

Monster Mitts

You will need:

Around 50g DK yarn. I used Magic Garden "Allsorts" which has approximately 123 metres. Because of the 30% polyester effect yarn, it's lighter than pure wool, and I have a little left (5-10gm) but if you were to use pure wool it might be closer to an entire 50gm ball.

3.75mm circular needles

3.25mm circular needles

Stitch marker

2 small safety pins or waste yarn for the thumb gusset stitches.

Using larger needles, CO 36 stitches. Join for working in the round with 18sts on each needle, and work 2" in 2x2 rib. (To make the mitts for bigger hands, increase your stitch count in increments of 4).

Knit for 1".

Now to begin the thumb gusset:

At the beginning of the next round, Kfb, then knit to end of round (37sts).

Next round: Kfb, knit to end of round (38sts).

Next round: (Kfb) twice, place marker (pm), knit to end of round.

Next round: Kfb, k2, kfb, pm, knit to end.

Next round: Kfb, k4, kfb, pm, knit to end.

Carry on like this until you have made 16 extra stitches before the marker. On the next round, place the extra stitches on the safety pins (8 on each) or onto waste yarn. Knit a further 4 rounds, ensuring that you pull the yarn tight over the thumb gusset join.

Knit the final inch in 2x2 rib, bind off loosely in rib.

Using the smaller circular needle, place half the thumb gusset stitches on each needle, and work 2x2 rib, joining to work in the round. Work 3 rounds, then bind off loosely in rib.

Work in the ends, and make its mate. Enjoy!

Monday, 13 April 2009

Darryl with a "Y"

A friend asked me to make fingerless mitts for herself and her man, after I made some for a mutual friend of ours. Here is a simple pattern for ribbed fingerless mitts which is written for man-sized hands, but I will also have instructions for women's in brackets.


Darryl with a "Y"

You will need:

2.75mm circular needles (2.5mm for women's)

Approximately 50gm fingering weight yarn. (For these I used a long-deleted Shepherd brand 4-ply crepe, for his partner's I'm using Haven by Naturally - much, much softer than the crepe)

2 small safety pins to use as stitch holders

A stitch marker for thumb gusset increases.

The Pattern:

Cast on 64 sts and join for working in the round (32 sts per needle).

Work in K2, P2 rib for 3 inches.

For the next 2 inches, knit in K1, P1 rib.

Next round: KFB, P1, *K1, P1 rib to end.

Next round: KFB, KFB, P1, *K1, P1 rib to end.

Next round: KFB, K1, KFB, PM, *K1, P1 rib to end.

Next round: KFB, K3, KFB, PM, *K1, P1 rib to end.

Next round: KFB, K5, KFB, PM, *K1, P1 rib to end.

Continue increasing 2 sts per round in this manner until you have 27 extra sts before the marker.

Next round: K 27 and put half (ok, not an even number) 13 sts on one safety pin, and 14 on the other. forget about those sts for the meantime, and continue to K1, P1 rib for another 5 rounds. Make sure you snug those sts up in the beginning of the rounds so as to help close up any gaps between the thumb and the hand of the mitt.

Change back to K2, P2 ribbing for the final 2.5 inches (2 inches for women's), cast off (or bind off, whichever takes your fancy) knitwise.

Put those thumb gusset sts back onto your needles. On the needle with 13 sts, pick up an extra 2 sts from the hand section, and on the needle with 14 sts, pick up one extra stitch. Knit one round plain.

Next round: K2tog, K1, *P2, K2 to last 3 sts, P2tog, P1.

Continue in K2, P2 rib for 6 more rounds, cast off knitwise.

Work in your ends, using the end that you joined on at the thumb to close up any hole between the thumb and hand sections. Do it all over again for the 2nd mitt.

As per usual, use the pattern for whatever, but please link back to my blog and credit me as the designer. If anything is unclear or doesn't quite seem right, let me know and I'll fix it up.


Sunday, 12 April 2009

Helena

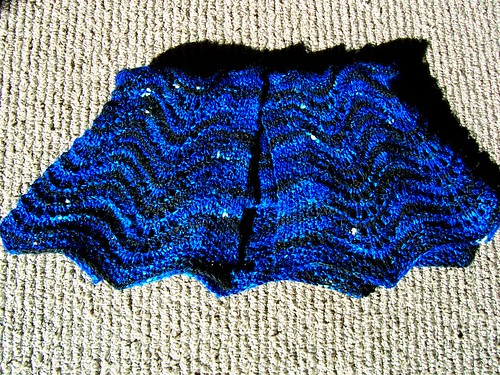
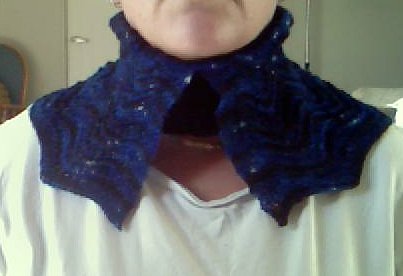
I don't know what it is, but I seem to be in a blue phase at the moment. I'm dyeing all sorts of colours, but blue must be my 'it' colour for knitting.

Here's my latest creation. It nearly wasn't a creation at all; I'd started making another Sapphire & Steel Cowl for my mum for Mother's Day but it turned into something a bit different. Feather and Fan pattern is so versatile and so pretty!

As with all my free patterns, use them for whatever you will, but please link back to my blog for the pattern and credit me as the designer. Also, if something doesn't seem right or doesn't quite make sense, let me know and I'll endeavour to fix/clarify.


Helena


You will need:

Approximately 50gm fingering weight yarn – a semisolid or striped yarn would work nicely.
2.75mm circular needles
3.25mm circular needles

Cast on 156 sts on 2.75mm circs and join for working in the round (78 sts per needle). Work in K3, P3 rib for 4 inches.
Knit one round.
Change to 3.25mm circs. Purl one row. From this point on you will knit flat - backwards and forwards, no longer in the round.

Stitch pattern:

Work in seed stitch or garter stitch for the first and last 6 sts of every row.

Row 1: Seed stitch first 6 sts, knit to last 6 sts, seed stitch last 6 sts.
Row 2: Seed stitch first 6 sts, purl to last 6 sts, seed stitch last 6 sts.
Row 3: Seed stitch first 6 sts, *(k2tog) 3 times, (yo, k1) 6 times, (k2tog) 3 times. Repeat from * to last 6 stitches, seed stitch last 6 sts.
Row 4: Seed stitch first 6 sts, knit to last 6 sts, seed stitch last 6 sts.

Repeat these 4 rows a total of 10 times.

Next 4 rows work either in seed stitch or garter stitch, whichever is your preference. I’ve done seed stitch for mine, but either would work equally well.

Bind off knitwise.

Work in ends, and block the feather and fan portion to within an inch of its’ life. I blocked the outer edges hard, less so near the ribbing, you want the ribbing to be stretchy.

Wear with pride!

Saturday, 28 March 2009

Target


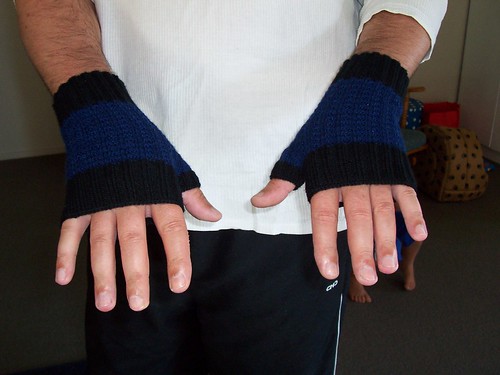
Here's another freebie for you, this time fingerless mitts for men. These were made for my bf's Dad, who belongs to a gun club and enjoys his target shooting. I thought they might help to keep his hands warm in winter without impeding his aim. As always, use the pattern for whatever/whoever you like, but please credit me by linking back to my blog for the pattern. And if you find any errors or something isn't clear, let me know and I'll endeavour to fix it.


Target
You will need:
Approximately 60gms of fingering weight yarn. I used Haven by Naturally in black and Patonyle sock yarn in navy. You don't need 2 colours, they'd look just fine all in one colour.
If you're using 2 colours, I've called the cuff colour "colour A" throughout, and the hand colour "colour B"
2 small safety pins to use as stitch holders
2.5mm circular needles
A stitch marker or 2 if you feel more comfortable using them during the increases.
The pattern:
With Colour A, CO 68 sts. Join for working in the round, being careful not to twist stitches. You should have 34 sts on each needle.
K2, p2 rib for 2 inches, break colour A and join in Colour B.

Pattern rounds –
Rnds 1 & 2: K all sts
Rnds 3 & 4: K2, P2 around.
Continue working these 4 pattern rounds until you have worked a further 2 inches.

Thumb gusset –
Into the first st of the next round, kfb. Continue the round in pattern.
At the beginning of the next round, kfb, kfb, continue the round in pattern.
Next round – kfb, k1, kfb, continue the round in pattern.
Next round - kfb, k3, kfb, continue the round in pattern.
Continue increasing on each round until you have 29 extra sts at the beginning of the round. On the next round, work those sts and place them onto 2 safety pins; 15 on the first and 14 on the second. Forget about those sts for now, and continue with the remaining sts (you should still have 34 on each needle) in pattern for a further 8 rounds.

Finger cuff –
Break Colour B and rejoin Colour A. Work k2, p2 rib for another 2 inches (more or less, depending on the recipient’s taste in length), and cast off knitwise.

Thumb cuff –
Put the stitches from the safety pins back onto your needles. Pick up an extra 3 sts from between the thumb gusset and the main body of the mitt (this will help to close up any gaps) and knit 1 round with Colour A. K2, p2 rib for 7 more rounds, then cast off knitwise.
Do it all over again.

Work in ends, and wear with pride.

Saturday, 14 March 2009

Last Minute...

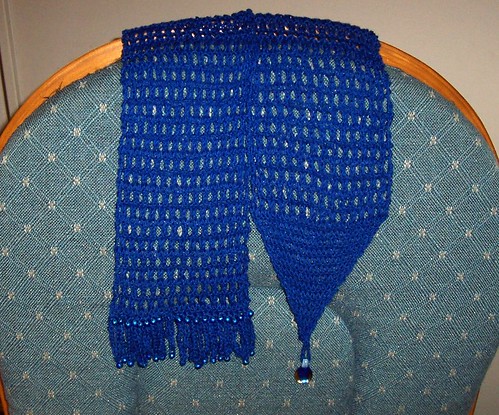
It's my oldest school friend's birthday today - so I decided to design her a scarf. Yesterday. Procrastination is my middle name! And my friend's middle name is Myna, hence the name of the scarf.


So, as usual, here is the pattern. Free to use blah blah. Please credit me as the designer as always, and link back to my blog for the pattern.

Myna

You will need:

Approximately 50g of fingering weight yarn. I used Moda Vera Soya because I love the drape, so something similar such as bamboo would work just as well. It's not a long scarf, I used about 165 metres (just over one ball). Make it as long as you like.

5mm knitting needles.

2.75mm crochet hook. (Don't worry, it's just for the beading at the end. If you can crochet a chain (ch) and do a slip stitch (sl st) , that's all you need to know. If you can't, learn - it's easy!)

A large-ish glass bead or pendant.

Approximately 30 6mm beads.


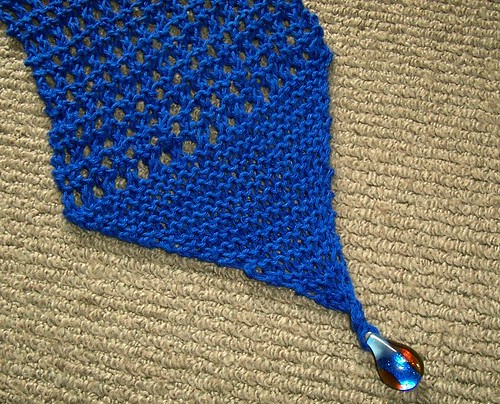
Cast on 3 sts.

Row 1: K3
Row 2: Kfb, k1, kfb (5sts)
Row 3: K5
Row 4: Kfb, k3, kfb (7sts)

Ok, you get the idea. You're knitting all the odd numbered rows, and increasing each even numbered row by 2 stitches, 1 at either end. I stopped when I got to 29 sts, but as long as you've got an odd number of stitches, you can have it as wide or as narrow as you like. Finish on an odd row.

The pattern:

Row 1: *K2tog, yo* to last stitch, k1.
Row 2: Knit all stitches.
Row 3: Knit all stitches.

That's all there is to it! Knit those 3 rows until the scarf is as long as you want it, and cast off at the end of a row 3. Leave the last stitch active though, you're going to use your crochet hook now.

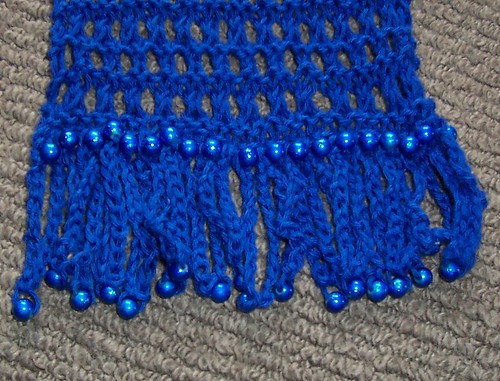
Thread your 6mm beads onto the yarn. With your hook, starting with the last active stitch, ch 11. Move one bead up, and secure it in the chain with a sl st. Ch 11, get another bead and secure it to the cast off row with a sl st. Carry on in this way, spacing your beads evenly across the cast off row (sometimes you'll secure in the next cast off stitch, sometimes you'll miss a stitch to keep it even) ending with a sl st and bead at the opposite end of the cast off row.

At the beginning end of the scarf, use the cast on tail of the yarn and crochet a chain of about 8 - 10 sts. Thread your large glass bead or pendant onto the chain, and secure the chain to the point of the scarf with a sl st.

Work in the ends. Easy huh?

Let me know if something's not clear or doesn't make sense and I'll try to write it clearer. Now - go to it!